How to Test a Fuel Sending Unit
For car enthusiasts and DIY aficionados, few things are as rewarding as diagnosing and fixing your vehicle’s issues. One crucial but often overlooked component is the fuel sending unit, responsible for relaying the amount of fuel in your tank to the gas gauge on your dash. Problems with this unit can cause inaccurate fuel readings, leading to unnecessary fill-ups or the nightmare scenario of running out of gas on the road. In this extensive guide, we will walk you through how to test a fuel sending unit, ensuring you can diagnose issues with confidence.
Tools and Materials Needed
Before beginning any maintenance on your vehicle, assembling the right tools and materials is essential. For testing your car’s fuel sending unit, you will need the following items:
- A full set of screwdrivers, from flathead to Phillips-head, including insulated types
- A pair of pliers, both regular and needle-nose, for a firm grip on various components
- A voltmeter or multimeter with read capability (if you don’t own one, borrowing or purchasing one is imperative for this task)
- A high-quality fuel pressure gauge
- Safety goggles and gloves to protect against the inevitable gasoline spills and fumes
- Penetrating oil to loosen any corroded parts
- A clean container to catch any spilled fuel
With these tools at the ready, you are well-prepared to undertake checking the health of your fuel sending unit safely.
Safety Precautions
Safety is paramount when working with fuel systems. Gasoline is highly flammable and its vapors can be explosive. Remember these safety guidelines:
- Work in a well-ventilated area, away from any potential sources of ignition.
- Wear gloves and safety goggles to protect your skin and eyes.
- Always drain and properly dispose of any fuel you remove from the tank.
- Keep a fire extinguisher designed for gasoline fires within arm’s reach.
Adhering to these precautions will help prevent accidents and ensure that the diagnostics on your fuel sending unit are conducted without any hitches.
Preparation Before You Starts
To properly test your fuel sending unit, it is essential to have your vehicle in a safe, level location. Safety standards dictate that this is done with the engine turned off and the car’s ignition key removed. The fuel tank should be nearly empty to prevent excess fuel exposure and spillage.
Another preparatory step is to disconnect the car battery, particularly if you will be using a multimeter. This step is necessary to prevent possible electrical surges and to ensure your safety working around electrical components.
3 Easy Methods for Testing Procedure
Method 1: Using a Multimeter
Step-by-step Guide
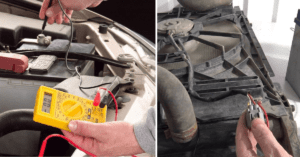
- Begin by locating your car’s fuel sending unit. It is often situated on top or inside the fuel tank, accessible through the trunk or under the back seat.
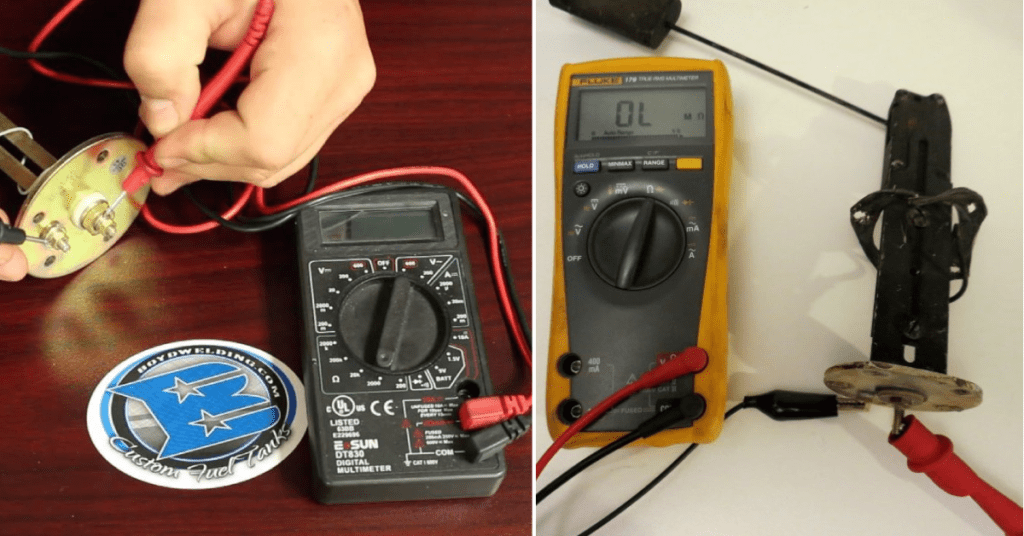
- With your multimeter set to read resistance (ohms), touch the positive (red) lead to the sending unit’s ‘S’ wire connection and the negative (black) lead to the ‘G’ wire connection. The sending unit is often labeled with these connections
- Take your readings and note the resistance.
- Move the float arm to simulate a full or empty tank, then take your readings again.
Interpreting the Readings
The resistance reading at full should be the same as the resistance shown in the specs provided by your car’s manufacturer. For instance, if your fuel sending unit’s spec is 40 ohms, the full reading should be 40 ohms, give or take 4 ohms. Similarly, the empty reading should be within that range below the full reading.
Common Mistakes to Avoid
- Ensure the multimeter is properly grounded and that there’s no interference with the readings.
- Double-check that you are using the ‘S’ and ‘G’ connections, which are specific to the sending unit, rather than other wires that might look similar.
- Avoid contact between the leads and any fuel, as this can damage the meter and create a shock hazard.
Method 2: Using a Fuel Pressure Gauge
Advantages of This Method
While more complex than using a multimeter, a fuel pressure gauge provides more accurate results, which can be critical for precision diagnostics.
Step-by-step Guide
- Relieve fuel system pressure by locating the fuel rail and its pressure relief valve. Cover the valve with a shop rag and depress the valve’s pin.
- Inject a fitting to the fuel rail and connect your pressure gauge.
- Turn on the ignition to activate the fuel pump, and observe the pressure reading. If you’re testing a fuel sending unit that is integrated with the fuel pump, you should see pressure above 30 psi.
- Turn the ignition off and note how long the pressure is maintained. Significant drops indicate a failing fuel sending unit.
Analyzing the Results
The pressure gauge will give you an immediate and unambiguous reading of the pressure in the fuel system. Rapid drops in pressure point to leaks or problems with the fuel sending unit’s fuel pump assembly.
Method 3: Visual Inspection
Signs to Look for
- If your fuel gauge fluctuates and fails to give you an accurate reading, or jumps between levels, it could indicate a problem with the sending unit.
- A “Check Engine” light might be illuminated alongside fuel-related trouble codes, such as P0462 or P0463.
Checking for Physical Damage
- Remove the unit from the tank (this might involve fuel tank removal), checking for physical damage of the float arm and resistor wire.
- Inspect for any corrosion or disconnection within the sending unit’s connections.
- Testing for continuity on the resistor wire using a multimeter can reveal if the wire has been compromised.
Interpreting Results
Once you’ve obtained your readings, whether through resistance with a multimeter or fuel pressure with a gauge, comparing them to your car’s manufacturer specifications is the next step. If the readings are significantly off, your fuel sending unit might be at fault.
Bear in mind that a failing sending unit may not always be the root cause. It could be a wiring issue or another component of the fuel system, which is why a systematic approach with the proper tools is crucial.
Common Issues and Solutions
- If you’re experiencing intermittent gauge readings, it could mean there’s variability in the resistor wire, perhaps due to corrosion or damage. The solution here is often cleaning and securing the wire or, if necessary, replacing the entire unit.
- Stuck or inconsistent gauge readings might be due to issues with the float arm. Ensuring the arm moves freely and has the appropriate range of motion is essential. Cleaning the mechanism can resolve minor issues, but replacement might be the only solution for severely damaged components.
Tips and Tricks For Testing the Fuel Sending Unit
Here are some helpful tips and tricks to keep in mind during the testing process:
- Always refer to your vehicle’s service manual for specific instructions and resistance values.
- If your fuel sending unit fails the resistance test, it’s best to replace it with a new one.
- Make sure to reconnect the battery and any electrical connections before reassembling any removed parts.
- Always prioritize safety by working in a well-ventilated area and wearing the appropriate protective equipment.
Overall, testing a fuel sending unit may seem daunting at first, but with the right tools and knowledge, it can be a straightforward task.
FQAs for Fuel Sending Unit Testing
My fuel gauge readings are erratic; could the issue be with the sending unit?
Erratic fuel gauge readings are a common symptom of a faulty sending unit, but they can also stem from wiring issues or the gauge itself. Testing these components methodically will help you home in on the problem.
Can a bad fuel sending unit affect my vehicle’s overall performance?
A bad sending unit won’t typically affect the vehicle’s drivability, but it can lead to unexpected fuel starvation issues, such as running out of gas with a seemingly full tank.
Do I have to drain the entire fuel tank to access the sending unit?
Not necessarily. Fuel levels below 1/4 are typically safe to work around. However, always take appropriate safety measures and be prepared to contain and clean up spilled fuel.
What is the voltage of the fuel sending unit?
The voltage of a fuel sending unit can vary depending on the specific make and model of a vehicle. Generally, it ranges from 4-20 volts, but it’s important to check your car’s manufacturer specifications for an accurate reading.
Conclusion
Conducting tests on your car’s fuel sending unit might seem daunting at first, but with the right tools, safety measures, and a systematic approach, it’s well within the capabilities of a dedicated DIY enthusiast. Remember to interpret results cautiously and be ready to explore other components of the fuel system if need be. Your efforts will not only save you money on potential repairs but will also deepen your understanding of your vehicle’s intricate systems.