

How to Test Your Radiator Fan With Multimeter
The radiator fan is the unsung hero of your car’s cooling system. It’s a relatively unobtrusive, circular fan that usually sits directly behind the radiator and does a vital job – ensuring your engine doesn’t overheat. In a sense, it’s like the quiet buddy who always has your back in a crisis. But what can you do when you suspect this trusty cooling companion might be on the fritz?
Car problems can often elicit a sense of dread, conjuring images of high repair costs and extensive downtime. However, not all issues require a professional mechanic’s savvy or wallet-crushing invoice. Learning to troubleshoot and test your vehicle’s radiator fan can not only save you money but also arm you with practical knowledge about your car’s vital systems.
In this comprehensive guide, we’ll walk you through the importance of testing your radiator fan, the tools you’ll need, and the step-by-step process of how to test your radiator fan with multimeter. We’ll also share some tips on diagnosing common radiator fan problems, best practices to prevent issues, and when it’s time to throw in the towel and call an expert.
Tools and Materials You’ll Need
To get started, ensure you have the following tools and materials:
- OBD-II scanner (optional): If your vehicle is equipped with an OBD-II port, an OBD-II scanner can be invaluable for diagnosing issues, including those related to the radiator fan.
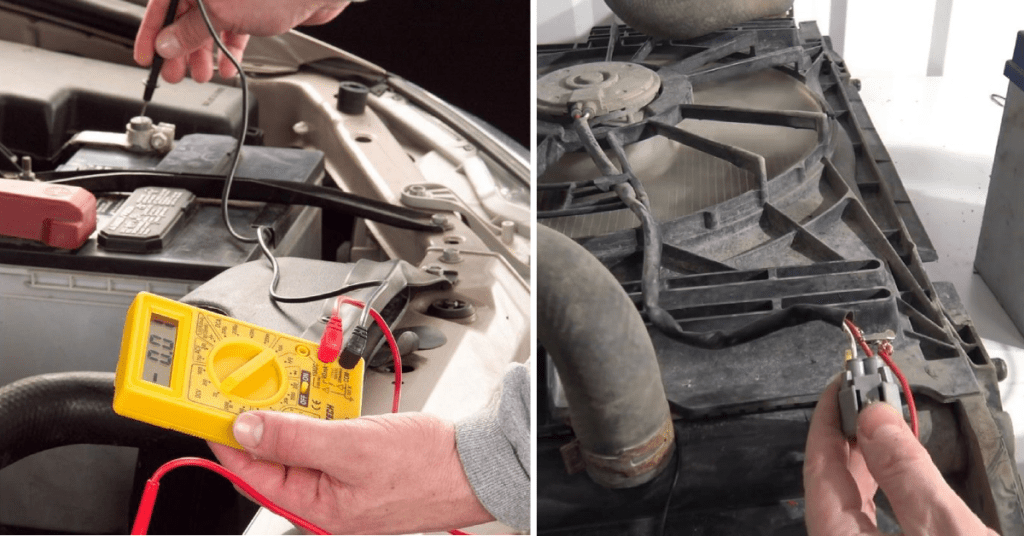
- Multimeter: This versatile tool is used for various electrical tests and is essential for checking the radiator fan’s electrical components.
- Screwdrivers: A set of flathead and Phillips screwdrivers will cover most of the screws and bolts you’ll encounter during the testing process.
- Pliers and wrenches: You may need these to adjust or remove components to access the radiator fan.
- Test light or continuity tester: Ideal for checking if electricity is reaching the fan and for ensuring electrical connections are sound.
- Jumper wires or circuit tester: These will help you bypass the fan’s wiring to test the fan directly.
- Safety gear: Always wear protective equipment, such as gloves and safety goggles, when working on your car.
- Owner’s manual: This will guide you to the location of your car’s radiator fan and provide important specifics about your model’s cooling system.
Safety Precautions
Before you start the testing process, it’s crucial to observe safety precautions. Here are some general guidelines:
- Ensure your car is parked on a level surface with the parking brake engaged.
- Do not work on the radiator or any other cooling system component while the engine is hot or immediately after it has been turned off. The coolant can reach temperatures that will cause severe burns.
- If the engine must be running during the test, ensure the car is in an open, well-ventilated area to avoid carbon monoxide buildup.
- Disconnect the vehicle’s battery to prevent electrical shocks or shorts during testing.
- Always be aware of moving engine components and keep clothing, hair, and any loose items clear of these dangers.
By following these precautions, you can mitigate many of the risks associated with testing your radiator fan.
6 Easy Step-by-Step Guide to Testing Your Radiator Fan
Below is a detailed breakdown of how to test your radiator fan. These steps apply to both electric and mechanical fans, with only minor variations.
Step 1: Locate Your Radiator Fan
Locating your radiator fan varies by car model. Usually, it’s visible when you pop the hood. Your owner’s manual will provide detailed instructions tailored to your vehicle’s make and model.
Step 2: Check for Visible Damage
Inspect the fan blades and the fan shroud for any signs of damage or wear. If there are cracked or bent blades, they can’t pull air effectively, potentially leading to engine overheating. Also, ensure the shroud is intact, as it directs airflow through the radiator.
Step 3: Inspect the Fan’s Wiring and Connections
With the battery disconnected, examine the fan’s wiring harness for fraying, corrosion, or any other damage. Also, check the connection at the fan and any grounds to ensure a good electrical connection.
Step 4: Test the Fan Relay and Fuses
Use a multi-meter to check for continuity across the fan relay. Read the owner’s manual to identify the appropriate pins to test. If the relay doesn’t show continuity when activated (usually by turning on the engine or the A/C), it may be faulty. Next, visually inspect and test the fuse responsible for the fan circuit. Replace any blown fuses with a fuse of the correct amperage.
Step 5: Perform a Continuity Test on the Fan Motor
Disconnect the fan motor and test for continuity using a multi-meter. Resistance readings can vary, so check your owner’s manual for your vehicle’s specifications. If the motor doesn’t show continuity or a proper resistance reading, it’s likely the culprit.
Step 6: Test the Radiator Fan with a Direct Power Source
For an electric fan, disconnect the wiring and use jumper wires connected directly to the battery to power the fan. If it doesn’t spin, the fan motor is likely to blame. For a mechanical fan, check that it spins freely when the engine is off. If it’s stiff or doesn’t turn at all, it needs to be replaced.
Test the Radiator Fan with the Engine Running
If your fan activates when the engine reaches a certain temperature, you’ll need to run the engine to trigger the fan. Observe the temperature gauge and wait for the engine to heat up. If the fan doesn’t turn on when the temperature rises, it’s a sign of a faulty fan.
Testing the Radiator Fan with an OBD-II Scanner
If your car has an OBD-II port (all cars since 1996), you can use an OBD-II scanner to read error codes related to the radiator fan. This method can quickly identify if there’s an issue with the fan or its associated components.
Common Reasons for Radiator Fan Failure
Radiator fans can fail for various reasons. Here are some of the most common causes:
- Blown fuse: A power surge or short circuit can blow the fan’s fuse, cutting off power to the fan.
- Faulty relay: The relay is an electronic switch that sends power to the fan. If it malfunctions, the fan won’t receive power.
- Defective motor: The fan’s motor can wear out over time or become damaged, preventing the fan from spinning.
- Bad thermostat: The temperature-sensing component may not engage the fan when it needs to.
Troubleshooting Common Radiator Fan Problems
For specific issues you encounter during the testing process, here are some common troubleshooting steps:
- If the fuse is blown: Identify the cause of the short circuit. It may be a worn wire touching metal, a faulty motor, or a failed relay.
- For a relay problem: You can often swap the fan relay with a similar one from a different system to test if the problem lies there.
- If the motor isn’t getting power: Work backward from the fan motor to find where the electrical connection is failing, which might be a faulty sensor, relay, or wiring problem.
- If the motor isn’t spinning normally: There may be dirt, debris, or corrosion preventing it from turning freely. Cleaning the motor may fix the issue.
Preventing Future Radiator Fan Problems
Prevention is always better than a cure. To keep your car’s cooling system, including your radiator fan, in top condition, consider the following maintenance practices:
- Regularly inspect the radiator, coolant levels, and fan belts for any signs of wear or damage.
- Flush and replace your vehicle’s coolant according to the manufacturer’s recommended intervals.
- Keep your engine bay clean and free of debris that could obstruct airflow to the radiator and fan.
- Listen and feel for irregular sounds or temperatures, which could be early indicators of a fan or cooling system issue.
By staying proactive, you can detect and address potential radiator fan problems before they escalate into more severe issues.
FAQs on How to Test Your Radiator Fan With Multimeter
How do I know if my radiator fan is not working properly?
You may notice several signs, including the engine running hot in traffic, the fan not turning on when the A/C is running, and visual confirmation of the fan not spinning when it should.
Can a car run without a radiator fan?
In cooler weather or at highway speeds, a car can often operate without the radiator fan. However, in stop-and-go traffic or on hot days, the fan’s role becomes critical in preventing the engine from overheating.
What should I do if my radiator fan fails while driving?
Reduce speed and try to get your vehicle to a safe place to stop. Turn the engine off to prevent overheating, and call for a tow or professional help.
When should my radiator fan turn on?
The radiator fan should turn on when the engine reaches a certain temperature, typically around 200-220 degrees Fahrenheit. It may also activate when the A/C is running. Refer to your owner’s manual for specific details on your vehicle’s cooling system and fan operation.
Conclusion
Testing your radiator fan is an essential part of your vehicle’s maintenance, especially for car enthusiasts and DIY mechanics. With this guide, you are equipped with the knowledge to take control of your car’s health and to address issues with your radiator fan confidently. By understanding how to test and troubleshoot this vital component, you not only protect your engine from potential damage but also gain a deeper understanding and appreciation of your car’s intricate cooling system.
Remember, always prioritize safety and consult your owner’s manual for specific instructions for your vehicle. And if at any point you feel overwhelmed, it’s okay to seek assistance from a professional mechanic. Your car’s cooling system, and by extension, your peace of mind on the road, will thank you.


