

How to Clean an Airless Paint Sprayer
Do you want to achieve flawless painting results with your airless paint sprayer? Of course, you do! But did you know that regular cleaning and maintenance are essential for keeping your favorite painting tool in top-notch condition? Don’t worry, we’ve got you covered! In this step-by-step guide, we will show you exactly how to clean an airless paint sprayer like a pro. From clearing clogged nozzles to preventing paint buildup, you’ll be armed with all the knowledge you need to ensure your sprayer is always ready for action. So grab your cleaning supplies and let’s dive into the world of airless paint sprayer maintenance!
Importance of Cleaning an Airless Paint Sprayer
Before we get into the nitty-gritty of how to clean an airless paint sprayer, let’s first understand why it’s so important. One of the main reasons is to prevent paint buildup and clogged nozzles. As you use your sprayer, small particles can mix with the paint and eventually cause blockages, leading to uneven painting results or even damage to your sprayer. Secondly, regular cleaning prevents old paint from drying and hardening on the internal components of your sprayer, which can also affect performance and lifespan. Finally, proper maintenance can save you money in the long run by extending the life of your airless paint sprayer.
Tools and Materials Needed for Cleaning
To effectively clean your airless paint sprayer, you will need the following tools and materials:
- Clean water
- Solvent/thinner (check manufacturer’s recommendations)
- Rags or paper towels
- Small brush or toothbrush
- Wrench or pliers (if needed)
- Bucket or container for flushing out paint
- Safety equipment (gloves, goggles, mask)
Safety Precautions for Cleaning
Before you begin cleaning your airless paint sprayer, it’s important to take some safety precautions. First and foremost, make sure the sprayer is unplugged and that the pressure has been released. Wear appropriate safety gear such as gloves, goggles, and a mask to protect yourself from any chemicals or debris. Also, make sure you are working in a well-ventilated area to avoid inhaling any fumes. Finally, follow all safety instructions and recommendations from the manufacturer for your specific model of airless paint sprayer.
10 Simple Step-by-Step Guide to Cleaning an Airless Paint Sprayer
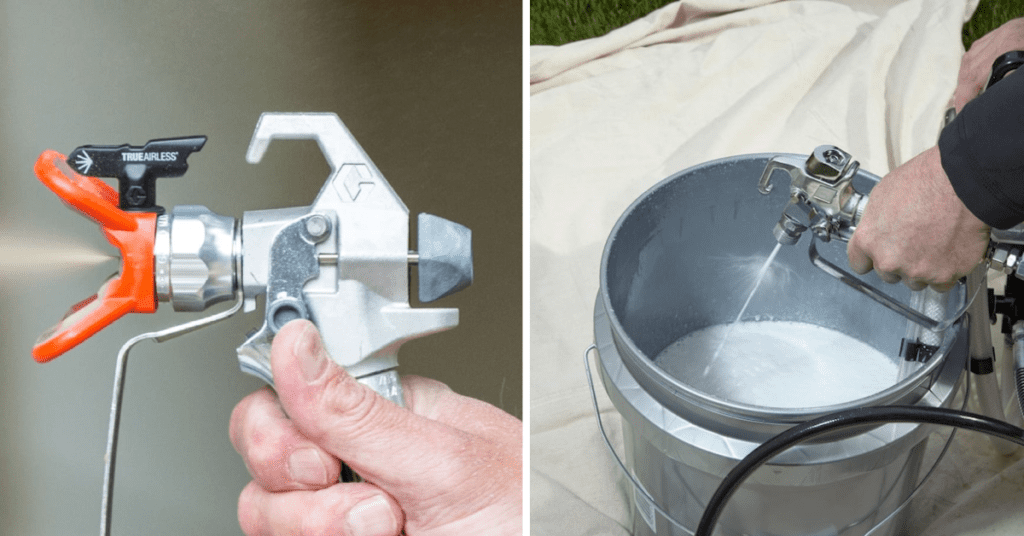
Step 1: Flushing the System
The first step is to flush the system with clean water. Start by removing the spray tip and guard from the gun, then turn on the sprayer and hold a bucket or container under the gun to catch the water as it flows out. Let the water run until it comes out clear, indicating that all paint has been flushed out of the system.
Step 2: Removing the Spray Tip and Guard
To proceed, carefully detach the spray tip and guard from the gun using a wrench or pliers if necessary. Take a moment to wipe them down with a clean rag or paper towel, ensuring any residue or debris is removed. Once cleaned, set them aside for later cleaning, as we’ll want them in optimal condition for future use.
Step 3: Cleaning the Spray Tip and Guard
To ensure optimal performance, it is important to thoroughly clean the spray tip and guard. Start by using a small brush or toothbrush to gently scrub the tip and guard with a mixture of water and solvent/thinner, following the specific recommendations provided by the manufacturer. Take your time to remove any paint residue and ensure a pristine surface. Once done, rinse the tip and guard it with clean water, leaving no trace of residue behind. This meticulous cleaning process will help maintain the longevity and efficiency of your spray equipment.
Step 4: Cleaning the Pump and Filter
After flushing the system and cleaning the spray tip and guard, it’s time to clean the pump and filter. First, remove any remaining paint from the pump with a rag or paper towel. Then, using a small brush or toothbrush, clean around the intake valve and inside the filter housing. Rinse with clean water.
Step 5: Cleaning the Suction Set and Hose
To ensure optimal performance, it is important to properly clean the suction set and hose. Begin by flushing them with clean water, and thoroughly removing any paint or debris that may have accumulated. Take extra care to run water through the hose, ensuring all particles are effectively cleared out. By following this detailed cleaning process, you can maintain the functionality and longevity of your suction set and hose.
Step 6: Cleaning the Hoses and Wires
Using a slightly damp rag, carefully and gently wipe down the hoses and wires to effectively eliminate any lingering paint residue. It’s important to exercise caution to prevent any potential damage to these vital components. Taking the time to thoroughly clean and maintain them will help ensure their optimal performance and longevity.
Step 7: Cleaning the Spray Gun and Trigger
To keep your spray gun and trigger in top shape, it’s crucial to clean them properly after each use. Start by flushing them with clean water to remove any leftover paint particles. If there’s stubborn buildup, gently scrub the surfaces with a small brush or toothbrush. Take your time and be thorough. Finally, rinse everything until there’s no residue left. By following these steps, you’ll maintain the efficiency of your spray equipment for future use.
Step 8: Cleaning the Pressure Control Knob and Fluid Filter
To clean the pressure control knob and fluid filter effectively, begin by using a damp rag. Give the surfaces a gentle wipe, making sure to get rid of any paint residue completely. Be thorough and cover all areas, paying attention to detail while you clean. Once you’re done, it’s crucial to rinse both the pressure control knob and fluid filter with clean water. This final step ensures a flawless finish and keeps your equipment running smoothly.
Step 9: Reassembling the Sprayer
Once all components have been thoroughly cleaned and dried, it’s time to carefully reassemble the sprayer. Begin by putting the parts back together in the opposite order of disassembly, ensuring a precise fit. Take a moment to double-check that all connections are tight and secure, as this will help prevent any potential leaks or malfunctions during operation. By following these steps diligently, you can ensure that your sprayer is reassembled properly and ready to be used effectively.
Step 10: Thoroughly Flushing the System Again
Before putting your freshly cleaned airless paint sprayer to use, it is crucial to ensure that all traces of cleaning agents have been eliminated from the system. To achieve this, take the time to flush the system once more with clean water. This final step guarantees that your equipment is free from any residual cleaning agents, allowing you to achieve optimal performance and flawless paint application. By diligently following this process, you can confidently embark on your painting project with a well-prepared and pristine airless paint sprayer.
You can also read How to get rid of spray paint smell.
Proper Disposal of Cleaning Materials and Paint Waste
After completing the cleaning process, it’s essential to dispose of any leftover paint and cleaning materials properly. Always follow local regulations for disposing of hazardous waste and avoid pouring any chemicals or solvents down the drain. If possible, recycle any containers used for storing paints or cleaners instead of throwing them away. Proper disposal practices not only help protect the environment but also ensure the safety of those handling the materials. By following these guidelines, you can maintain a clean and responsible work environment while effectively maintaining your airless paint sprayer for future use. So, it’s important to always be mindful of proper disposal methods and regulations.
Regular Maintenance Tips for Your Airless Paint Sprayer
While thorough cleaning after each use is essential, regular maintenance can also help prolong the life of your airless paint sprayer. Here are some tips to keep in mind:
- Check and tighten connections regularly to prevent leaks or malfunctions.
- Inspect hoses and wires for any signs of wear or damage, and replace if necessary.
- Lubricate moving parts as recommended by the manufacturer.
- Store your airless paint sprayer in a clean and dry environment to prevent any buildup of dust or debris.
By following these simple maintenance tips, you can ensure that your equipment is always ready for use and performing at its best. With proper care and maintenance, your airless paint sprayer can last for many years, saving you time and money in the long run. So, make it a habit to regularly maintain your equipment for optimal performance and longevity. Remember, an airless paint sprayer is an investment that can greatly benefit your painting projects, so taking care of it is essential.
Troubleshooting Common Issues for an Airless Paint Sprayer
Even with regular maintenance, you may encounter some issues with your airless paint sprayer. Here are a few common problems and their potential causes:
- Uneven spray pattern: This could be due to clogged or worn spray tips. Thoroughly clean or replace them as needed.
- Drips or runs in the paint: This could be caused by a dirty filter or a faulty pressure control knob. Clean or replace these components to resolve the issue.
- Inconsistent pressure: This could be due to leaks, worn seals, or clogged filters. Check and fix any potential issues with these parts.
- Motor not running: This could indicate an electrical problem, such as a damaged cord or switch. Disconnect the power source and check for any visible damage, or consult a professional for repairs.
If you encounter any other problems with your airless paint sprayer, always refer to the manufacturer’s manual for troubleshooting tips. If the issue persists, it may be best to seek professional assistance.
FAQs on Airless Paint Sprayers
What type of paint can I use with an airless paint sprayer?
Airless paint sprayers can handle a variety of paints, including latex, oil-based, and solvent-based paints. However, make sure to check the manufacturer’s guidelines for specific recommendations.
Can I use my airless paint sprayer for other applications besides painting walls?
Yes, airless paint sprayers can also be used for staining decks, spraying furniture, and even applying texture to surfaces.
Can I leave paint in my airless paint sprayer overnight?
It is recommended to clean your airless paint sprayer immediately after each use to prevent clogs and ensure optimal performance. However, if needed, you can leave the paint in the system overnight by storing it according to the manufacturer’s instructions.
Conclusion
Proper maintenance and care are crucial for the efficient operation of an airless paint sprayer. By following the steps outlined in this guide, you can ensure that your equipment is always ready for use and performing at its best. Remember to regularly clean, flush, and maintain your sprayer for optimal results and longevity. When troubleshooting any issues, consult the manufacturer’s manual or seek professional assistance for reliable solutions. Happy painting!


