

How to Remove Old Caulk from Baseboards
Effective caulk around your baseboards is a silent protector for your home’s interior, guarding against moisture, drafts, and unsightly gaps. But when that caulk turns yellow, cracks, or loses its pliability, it transitions from guardian to troublemaker. In this extensive guide, we’ll walk you through how to remove old caulk from baseboards safely, reviving not only the aesthetic appeal of your living space but also ensuring the continued longevity of your home.
Understanding the Importance of Removing Old Caulk
Old, deteriorating caulk can lead to significant issues over time. It compromises the insulation and can increase energy bills by letting the air seep out and allowing moisture to creep in, potentially fostering mold growth. By understanding these repercussions, you underline the necessity of proactive maintenance, which often starts with properly removing old materials.
Assessing the Condition of the Old Caulk
Before you tackle your baseboards with any tools, examining the caulk closely is crucial. Is it cracked or pulled away from the wall? Has it discolored or become hardened? A detailed inspection will dictate the approach you take and the effort required.
If the caulk has only minor cracks, you can patch it, but for anything more severe, it’s best to remove the old and reapply completely new caulk.
Gathering the Necessary Tools and Materials
Every endeavor is successful with the right equipment. To remove old caulk effectively, consider assembling the following:
- A utility knife or a razor blade for cutting the caulk
- A caulk removal tool, which could be a scraper or a specialized caulk removal tool
- Rubbing alcohol and a lint-free cloth for cleaning the area post-removal
- A hairdryer or a caulk softener/repellant to soften the caulk
- A razor scraper or a putty knife for the preferred method of removal
- A caulk gun and the appropriate type of caulk for reapplication
Be sure to have gloves, safety glasses, and a dust mask for protection, especially if the caulk is old.
Safety First: Preparing Yourself and the Work Area
As with any DIY project, safety should be a priority. Before removing the old caulk, take the necessary precautions to protect yourself and your surroundings.
- Wear gloves to avoid contact with harsh chemicals or sharp tools.
- Put on safety glasses to shield your eyes from debris while working.
- If using a hairdryer or caulk softener, ensure proper ventilation in the work area.
- Cover any nearby furniture or flooring with plastic sheeting to protect them from damage.
4 Easy Steps to Remove Old Caulk from Baseboards
Step 1: Softening the Caulk
Softening old caulking can significantly ease the removal process. Applying heat to the caulk using a hairdryer or a caulk softener/repellent is an effective method. It’s important to prioritize safety by carefully following all instructions, especially when using chemical products. Take your time when applying heat or the chosen product, as this process may require some patience for optimal results.
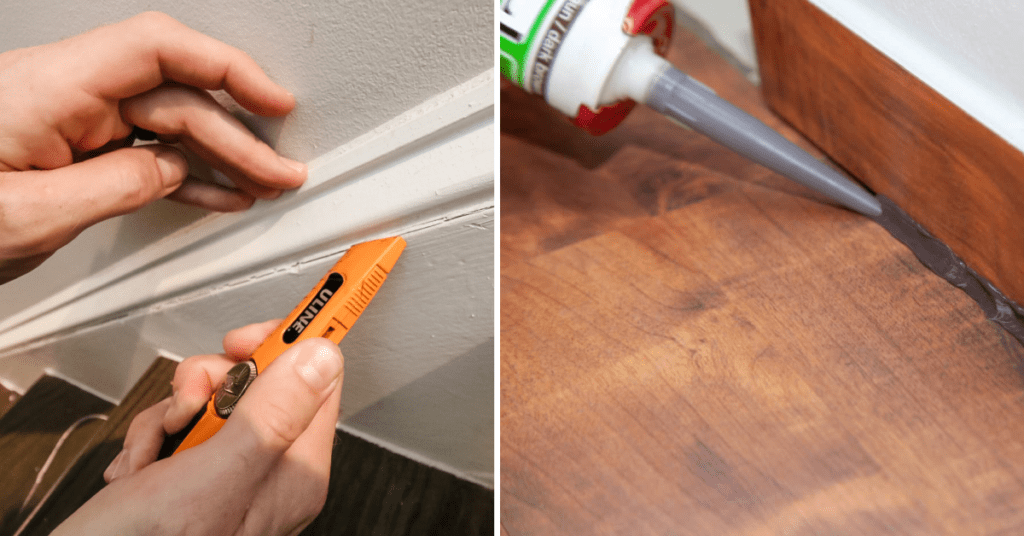
Step 2: Cutting Away the Old Caulk
Once the caulk is softened, carefully cut through the center of the bead with a utility knife or a specialized caulk-cutting tool, this should be a relatively effortless process, owing to the softened state of the material.
Step 3: Scraping Off Residual Caulk
Take a putty knife or a caulk removal tool and scrape away the loosened caulk. Work patiently to avoid damage to the baseboard or wall. You may need to make multiple passes to remove the caulk, especially with tougher, completely rubber-based caulks.
Step 4: Cleaning the Surface
Rub alcohol on the newly exposed surfaces thoroughly. This process will dissolve any stray bits of caulk and any lingering contaminants. A clean surface is pivotal to successful re-caulking.
Inspecting for Remaining Caulk and Residue
Don’t be surprised if you notice remnants of caulk or adhesive on your baseboards after your initial cleaning. A meticulous inspection can help to identify these spots, ensuring a smoother application for your new caulk.
Additional Methods for Stubborn Caulk Removal
Some types of caulk may prove more challenging to remove, and you may need to employ alternative methods. Here are two additional techniques that could be effective:
- Using a chemical adhesive remover: Apply the product according to its instructions and wait to soften the caulk before scraping.
- Applying vinegar or mineral spirits: These natural options can also help break down stubborn caulk. Apply and let sit for a few minutes before scraping. Be sure to use protective gear and proper ventilation when using these products.
Precautions to Protect the Baseboard and Surrounding Area
When removing old caulk, you must be careful not to damage the baseboard or surrounding area. Some tips to follow include:
- Use a sharper blade for better control and precision.
- Work slowly and use light pressure to avoid gouging or scratching the baseboard.
- Protect adjacent surfaces with painter’s tape.
- Use a caulk softener or hairdryer to avoid using excessive force.
- Wear gloves to protect your hands.
Tips for a Clean and Effective Removal Process
- Wear gloves, safety glasses, and a dust mask for protection.
- Use caulk softener or heat to make the removal process easier.
- Work slowly and patiently to avoid damage to the baseboard or wall.
- Thoroughly clean the area before re-caulking.
- Inspect for any remaining residue before beginning reapplication.
Following these tips and techniques, you can effectively remove old caulk from your baseboards and prepare for a fresh application. This not only improves the look of your home but also ensures its continued function and protection.
Troubleshooting Common Issues During Caulk Removal
In case you encounter any roadblocks, here are a few tips to help you navigate the process:
- If the caulk is not softening, try leaving rubbing alcohol on for a longer period of time.
- For stubborn areas, use a razor scraper or putty knife to chip away at the caulk carefully.
- If using a hairdryer, ensure it is set to low heat and not too close to the surface, which can cause damage or discoloration.
- If you accidentally remove some paint or finish from your baseboard, don’t worry! You can touch it once the new caulk has been applied and dried.
FAQs for How to Remove Old Caulk from Baseboards
How do I know if I need to remove old caulk?
Yellowing, cracking, shrinking, and hardening are all signs that it’s time to remove old caulk. It’s also wise to revisit caulked areas if you’re experiencing drafts or moisture issues.
What is the best caulk to replace the old one?
The best caulk will depend on the specific needs of the area. For baseboards, silicone or flexible acrylic caulks are most commonly used.
How often should I replace the caulk around my baseboards?
Usually, caulk needs replacement every five years, but it can vary depending on the product and environmental conditions. Regular checks and maintenance can prolong the life of your caulk.
Can I just put the new caulk over the old one?
In most scenarios, it is not recommended, as the old caulk may affect the bond of the new one. It’s better to remove the old material and start fresh.
Conclusion
Removing old caulk from your baseboards is a systematic process that requires patience and care. By following this detailed guide, you can ensure that you’re not only refreshing the look of your home but also preserving its structural integrity. Remember, a well-maintained home is a happy home, and the journey to maintaining your baseboards is as important as the result.


