

How to Adjust Regulator on Air Compressor
An air compressor is more than a mere machine in the world of DIY and workshop enthusiasts, it’s a powerhouse of possibility, ready to inflate tires, power air tools, and paint your dreams into reality. However, harnessing this potential requires more than just plugging in and pressing a button. One of the most crucial yet often overlooked aspects is the air compressor regulator.
Adjusting the regulator on your air compressor is an intricate process with the potential to significantly affect the performance and safety of your tools. But fear not, fellow DIYers! In this comprehensive guide, we’ll walk you through the process of how to adjust regulator on air compressor output and fine-tune it to perfection.
When Should You Adjust the Regulator?
There are several instances where you might want to adjust the regulator on your air compressor:
- New Tools: When you start using a new air tool, it may require a different level of pressure than your previous ones.
- Task Change: Switching between tasks that demand varying levels of pressure, such as inflating a tire versus sandblasting, necessitates a regulator adjustment.
- Pressure Drop: Over time, the pressure in your tank may drop due to leaks or other reasons, requiring an increase in compressor output.
- Routine Maintenance: Regularly checking and adjusting the regulator ensures that your equipment keeps running at its best.
In short, any change in task, tool, or system pressure warrants a regulator check and adjustment if necessary.
Safety First Preparing for Regulator Adjustment
Safety should always be the first priority when working with any machinery, and air compressors are no exception. Before you even think about touching the regulator, here’s a safety checklist you must run through:
- Turn off the air compressor and disconnect it from the power source to prevent accidental starts.
- Release all the air pressure from the tank by activating the safety valve.
- Allow the compressor to cool down if it’s been running.
- Put on safety goggles and work gloves to shield yourself from potential high-pressure air bursts and any contaminants that may be expelled during the process.
Adhering to these steps ensures you can work on your compressor with peace of mind and reduces the risk of accidents.
Tools and Materials Needed
Gather the following tools and materials before you start:
- Safety goggles
- Work gloves
- Wrenches (usually a set of two, as you may need one to hold the fitting in place while you adjust with the other)
- An air pressure gauge (to verify the pressure in the system)
Having these on hand will make the adjustment smoother and safer.
Locating the Regulator on Your Compressor
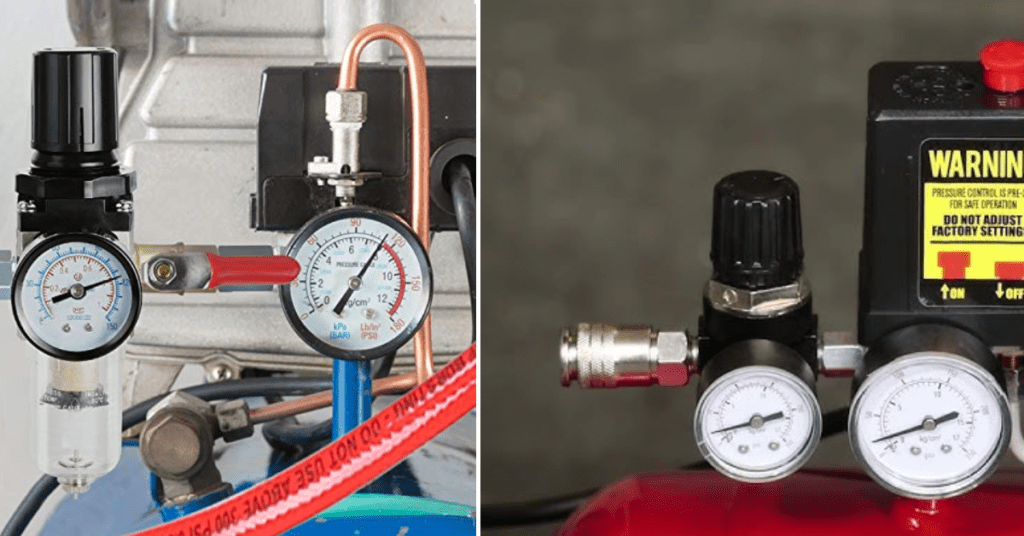
The location of the regulator on your air compressor can vary, but it’s usually found near the outlet where you connect your air hose. It will be connected to the tank and have a visible pressure gauge attached to it. Check your user manual if you’re having trouble finding it. Always ensure you’re adjusting the main pressure regulator and not a specialized one used for certain tools or processes.
6 Easy Step-by-Step Guide for Adjusting the Regulator
Once you’ve safely prepared and located the regulator, it’s time to adjust it. The process is straightforward, but precision is essential.
Step 1: Preparing the Compressor
Ensure all safety measures are in place. The compressor is turned off, disconnected from the power supply, and the air pressure is completely released.
Step 2: Turning the Regulator Knob
Grips the regulator’s adjustment knob. Most knobs can be turned by hand, but for stiff ones, use an appropriately sized wrench to turn the knob counterclockwise to decrease the pressure or clockwise to increase it.
Step 3: Finding the Right Pressure Setting
Using your air pressure gauge, check the pressure level you need for your specific tool or task. Turn the knob gradually until you reach the correct setting. It’s best to make small adjustments as you near the required pressure to prevent overshooting it.
Step 4: Locking the Regulator in Place
Some regulators have a locking mechanism to prevent the knob from turning unintentionally. Once you’ve set the desired pressure, engage the lock to keep the setting in place.
Step 5: Testing the Adjustment
After locking in your setting, turn on the compressor and check the pressure with your gauge again. It should be reading the pressure you set. If it’s not, repeat the adjustment process to get it right.
Step 6: Fine-Tuning for Optimal Performance
For specialized tools or more sensitive applications, you might need to fine-tune the pressure setting once you start working to find the ideal performance level. This is a trial-and-error process but is vital for getting the most out of your tools.
When Things Go Wrong Troubleshooting Tips
If, after adjustment, your tools still don’t perform as expected, there could be several reasons why. Here are a few troubleshooting steps to consider:
- Check for air leaks in the hose or fittings by spraying a soapy water solution onto them. If you see bubbles, you’ve found your leak.
- Inspect the tool itself for any damage or clogs.
- Ensure the compressor’s inlet filter isn’t clogged, as this could restrict airflow into the tank and cause lower pressure.
Addressing these issues can sometimes solve performance problems without having to readjust the regulator.
Regular Maintenance for Air Compressor Regulators
It’s not just cars that need regular tune-ups; air compressors do too. Check and clean your regulator yearly, making adjustments as needed to maintain a peak performance level. This also extends the life of both the compressor and the tools it powers.
If you find yourself adjusting the regulator frequently or needing to fine-tune it to a precise level that your current model can’t achieve, it might be time for an upgrade. There are higher-end regulators on the market that offer finer control and more precision settings, perfect for demanding or diverse applications.
FAQs About Regulator Adjustment
Can I adjust the regulator when the compressor is running?
It’s not advised to adjust the regulator with the compressor running, as changes in pressure can impact the integrity of the system or lead to sudden release of air.
What if my regulator doesn’t seem to be changing the pressure?
If turning the regulator knob doesn’t change the pressure, it could be seized. Attempt using a suitable lubricant to free it up before resorting to more drastic measures.
Why does my regulator lose its setting over time?
This can be due to regular vibrations from the compressor’s operation or, for older models, the natural wear and tear of the components. The lock washer or screw may also be loose
What is the pressure range of a regulator?
The pressure range can vary depending on the model and manufacturer, but most regulators have a range of 0-150 PSI.
Conclusion
Adjusting the regulator on your air compressor is a skill every DIY enthusiast should master. With the right preparation, tools, and step-by-step guidance, you can ensure that your compressor operates at the optimal pressure for safety and performance. Remember, safety first, precision second, and always look to fine-tune your adjustments as needed to get the most out of your tools and projects. Happy DIY’ing!


