

How to Caulk Chimney Flashing
Are you looking for an easy way to repair your chimney flashing and keep the water out of your home? Caulking is a great way to fix any gaps in your flashing and prevent leaks. In this how-to guide, we’ll show you how to caulk chimney flashing, along with tips on training drafty chimneys and avoiding potential problems in the future. So whether you’re new at caulking or need a refresher course, don’t miss this step-by-step guide that will help ensure that your caulking job lasts for years!
The Importance of Proper Chimney Flashing
Before we dive into the process of caulking chimney flashing, it’s essential to understand why proper flashing is crucial. Chimney flashing serves as a barrier between your roof and chimney, preventing water from seeping inside your home. Without adequate flashing, water can easily leak in and cause damage to your ceiling and walls, leading to expensive repairs. It also helps protect against drafts, keeping your home warm and energy-efficient. Without proper flashing, air can enter your chimney and cause drafts or even backdrafts that could result in a fire hazard. So not only is it essential for the structural integrity of your home, but also the safety of you and your family.
Tools and Materials Needed for Caulking Chimney Flashing
To successfully caulk your chimney flashing, you will need the following tools and materials:
- High-quality silicone caulk
- Caulk gun
- Utility knife or scraper
- Wire brush or sandpaper
- Rags or paper towels
- Safety glasses and gloves
Make sure to choose a high-quality silicone caulk specifically designed for outdoor use, as it will be exposed to the elements. You can find all these tools and materials at your local hardware store or online.
Safety Precautions for Caulking Chimney Flashing
It’s important to take proper safety precautions when caulking your chimney flashing. Here are a few things to keep in mind:
- Wear safety glasses and gloves to protect your eyes and hands from any debris or chemicals.
- Ensure that your ladder is securely placed and stable before climbing up to your roof.
- Use caution when working near the edge of your roof and always have a spotter to help keep you safe.
- Avoid working on your chimney flashing during wet or windy weather conditions to prevent slips and falls.
Preparing the Chimney Flashing
Step 1: Inspecting Existing Flashing
Before you begin caulking your chimney flashing, it’s crucial to conduct a thorough inspection of the existing flashing to identify any damage or gaps. Pay close attention to the caulk, checking for signs of cracks or holes that may compromise its effectiveness. Take a careful look at the metal flashing, examining it for any signs of rust or corrosion that could weaken its structural integrity. Additionally, ensure that the surrounding shingles are in good condition, with none being loose or missing, as this can create vulnerabilities around the chimney. By conducting a meticulous inspection and addressing any issues beforehand, you’ll establish a solid foundation for your new caulk application.
Step 2: Cleaning the Surface
To ensure that the surface of your flashing is impeccably clean and free from debris or old caulking, it is crucial to take a few extra steps. Start by using a wire brush or sandpaper to meticulously eliminate any traces of rust, dirt, or loose caulk. This meticulous preparation will lay the foundation for smooth and sturdy flashing. After completing this step, gently wipe down the surface with a damp cloth to remove any remaining residue. Finally, allow the flashing to dry completely before proceeding with any further installation or maintenance tasks. Adhering to these additional measures will significantly enhance the overall effectiveness and longevity of your flashing system.
Choosing the Right Caulk for Your Chimney Flashing
When selecting caulk for your chimney flashing, you must choose the right type to ensure proper adhesion and longevity. Silicone caulk is a popular choice among homeowners because of its outstanding waterproof properties and flexibility. It can withstand extreme temperatures, making it ideal for use in outdoor applications. Additionally, silicone caulk adheres well to various surfaces such as metal, brick, and wood. Its flexibility also allows it to expand or contract with changes in temperature without cracking or breaking. While there are different types of caulk available, make sure always to choose high-quality silicone caulk for your chimney flashing.
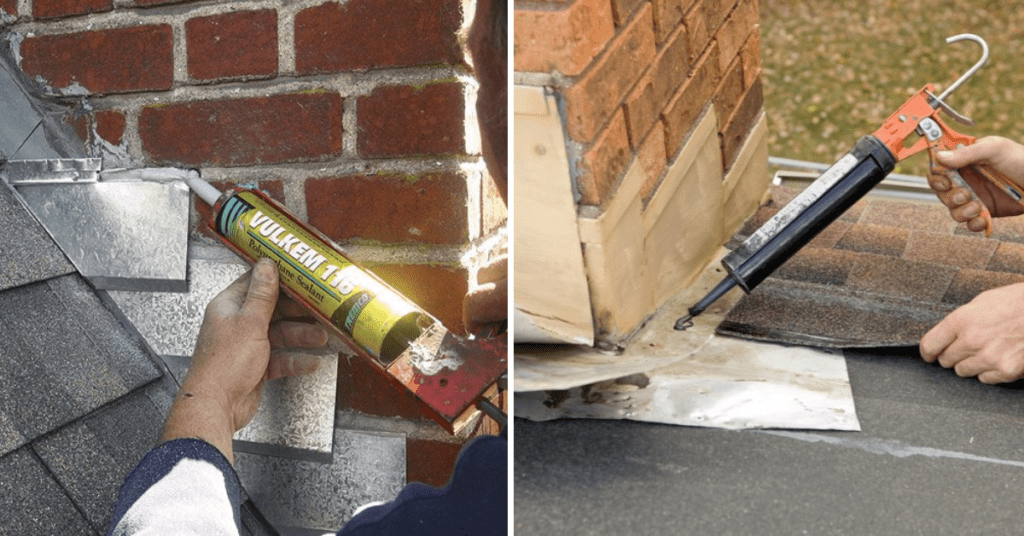
6 Easy Steps for Caulking Chimney Flashing
Step 1: Applying Caulk to the Base Flashing
Start by loading the silicone caulk into your caulk gun, making sure to follow the manufacturer’s instructions. Next, place the tip of your caulk gun at a 45-degree angle and apply a thick bead of caulk along the base flashing where it meets your roof. Use your gloved finger or a putty knife to smooth out the excess caulk and create a clean, straight line. This step will help prevent water from seeping underneath the flashing and creating leaks.
Step 2: Applying Caulk to the Chimney Saddle
Using the same technique as in Step 1, apply caulk along the top edge of your chimney saddle where it meets your roof. Make sure to apply a generous amount of caulk to create a strong seal. Use your finger or putty knife to smooth out the caulk and create an even surface.
Step 3: Caulking the Joints
Next, move on to caulking any joints in the flashing such as where two pieces of metal flashing meet. Apply caulk along these areas, making sure to fill in any gaps or holes. Use your finger or putty knife to smooth out the caulk and create a seamless finish. It’s essential to be thorough during this step to ensure that all joints are adequately sealed.
Step 4: Caulking the Chimney Stack
Finally, apply caulk along the edges of the chimney stack where it meets your roof. This will help prevent water from seeping in and causing damage to your chimney or roof. Use your finger or putty knife to smooth out the caulk and create a neat finish.
Step 5: Sealing the Top Flashing
If your chimney has a top flashing, make sure to seal it with caulk as well. Follow the same steps as above, applying a generous amount of caulk along the edges and smoothing it out with your finger or putty knife.
Step 6: Smoothing the Caulk Bead
To ensure a professional-looking finish, use a caulk finishing tool or your finger to smooth out the bead of caulk. This step will also help create a stronger seal and prevent any water from seeping underneath the flashing.
Inspecting and Testing the Caulk Seal
After completing the caulking process, it’s crucial to let the caulk cure for at least 24 hours before performing a thorough inspection and testing. Carefully check all areas of your chimney flashing for any signs of cracks or gaps that may have been missed during the initial caulking. If you notice any issues, apply an additional layer of caulk and repeat the smoothing process. Once satisfied with the caulking, conduct a water test by spraying your chimney flashing with a garden hose. Check for any signs of leakage and address them immediately if found. By thoroughly inspecting and testing your caulk seal, you can ensure that it will effectively protect your chimney from water damage.
Proper Maintenance for Your Chimney Flashing
To extend the lifespan of your chimney flashing and maintain its effectiveness, it’s essential to conduct regular maintenance. Keep an eye out for any signs of damage or wear and tear, such as cracked caulk or rusted metal flashing. If you notice any issues, address them promptly to prevent further damage. Additionally, consider applying a fresh layer of caulk every few years to maintain a strong seal and protect against potential leaks. By staying proactive with maintenance, you can ensure that your chimney flashing will continue to do its job effectively for years to come.
Tips and Tricks for a Successful Caulking Job
To achieve the best results when caulking your chimney flashing, keep these tips and tricks in mind:
- Always use high-quality silicone caulk specifically designed for outdoor applications.
- Make sure to thoroughly clean and dry the surface before applying caulk.
- Apply caulk generously to ensure proper adhesion and sealing.
- Use a caulk finishing tool or your finger to smooth out the caulk bead for a professional finish.
- Allow the caulk to cure for at least 24 hours before testing and inspecting.
- Stay proactive with regular maintenance to ensure the longevity of your chimney flashing.
By following these tips and tricks, you can successfully caulk your chimney flashing and protect it from water damage.
FAQs for Chimney Flashing Caulking
How often should I re-caulk my chimney flashing?
It is recommended to re-caulk your chimney flashing every few years to maintain a strong seal and prevent any potential leaks.
Can I use any type of caulk for my chimney flashing?
While there are different types of caulk available, it’s best to use high-quality silicone caulk specifically designed for outdoor applications.
How long does it take for caulk to cure?
Caulk typically takes around 24 hours to cure, but this can vary depending on the temperature and humidity levels in your area
Can I use a pressure washer to clean my chimney flashing before caulking?
It’s not recommended to use a pressure washer as it can damage the flashing and potentially create more leaks. Stick to using a hose or scrub brush to clean the surface before caulking.
What should I do if I notice leaks after caulking my chimney flashing?
If you notice any leaks, address them immediately by applying an additional layer of caulk and repeating the smoothing process. If the issue persists, it’s best to consult a professional for further assistance.
Conclusion
Now you have the knowledge and tools to properly insulate your chimney flashing using caulk. Properly insulating your chimney flashing not only ensures that your family is safe from any potential hazards in the future, but can also help reduce costs associated with energy bills. Look for signs of damage such as cracks and rust, and keep a close eye on the condition of caulking to make sure it remains intact.
If needed, consult with a professional roofer or chimney inspector for more advice and guidance. Take advantage of the information provided here to make sure you get the job done efficiently and correctly, as proper insulation is essential for peace of mind when it comes to keeping your chimney functioning at its best. Don’t wait—start caulking your flashing today!


