

How to Prevent Mold in Shower Caulk
Mold in shower caulk is not just an unsightly annoyance, it’s a health hazard and a sign of potential underlying issues in your bathroom maintenance routine. Homeowners and DIY enthusiasts often encounter mold but aren’t sure how to effectively combat and prevent it. This post will guide you through understanding the causes of mold growth in shower caulk and steps how to prevent mold in shower caulk and take to maintain a clean, healthy shower space.
The Causes of Mold to Grow in Shower Caulk
Shower caulk is especially susceptible to mold growth due to its direct exposure to water which frequently results in the area remaining damp for extended periods. Mold and mildew flourish in environments with high moisture levels, making the damp conditions of a shower’s caulking ideal for their proliferation. This situation is further exacerbated when the shower area lacks adequate ventilation, as stagnant air does not allow moisture to dissipate. Consequently, these conditions create the perfect breeding ground for mold and mildew, posing potential health risks and necessitating regular maintenance to prevent their occurrence.
Tools Need to Prevent and Combat Mold Growth
Fortunately, taking preventative action and combatting mold growth in shower caulk is relatively simple. You’ll need a few basic tools to get started:
- Bleach solution: A mixture of bleach and water is an effective way to kill mold spores and remove stains.
- Scrub brush or sponge: Mold can be tough to remove, so a sturdy scrub brush or sponge will come in handy.
- Protective gear: It’s essential to protect yourself while cleaning mold, so wear gloves, a mask, and safety glasses.
- Ventilation: Adequate ventilation is key to preventing mold growth. Ensure your bathroom has proper ventilation through an exhaust fan or regularly opening windows during and after showering.
- Sealant: Once the mold is removed, sealing the shower caulk with a waterproof sealant will help prevent future moisture from seeping in and creating another mold problem.
Step-by-Step Guide to Preventing Mold in Shower Caulk
Step 1: Ensure Proper Ventilation
Good airflow is crucial in combating mold growth. Always use an exhaust fan during and after a shower for at least 30 minutes to help reduce humidity levels. Opening windows, if available, can further help to improve ventilation in the bathroom.
Step 2: Regular Cleaning Routine
Incorporate cleaning your shower caulk with the right products into your weekly cleaning routine. A simple bleach solution (one part bleach to ten parts water) can effectively kill existing mold spores. For a more natural approach, vinegar, though milder, has antimicrobial properties that can help keep mold at bay.
Step 3: Keep the Area Dry
After showering, squeegee water off the tile walls and floor. Wipe down any excess moisture from the shower doors and caulk with a clean, dry cloth. Keeping the area as dry as possible helps minimize the conditions mold needs to grow.
Step 4: Apply a Mold Inhibitor
Products containing a biocide or mold inhibitors can significantly reduce the possibility of mold growth. Treat your shower caulk with these solutions according to their instructions for an added layer of protection against mold.
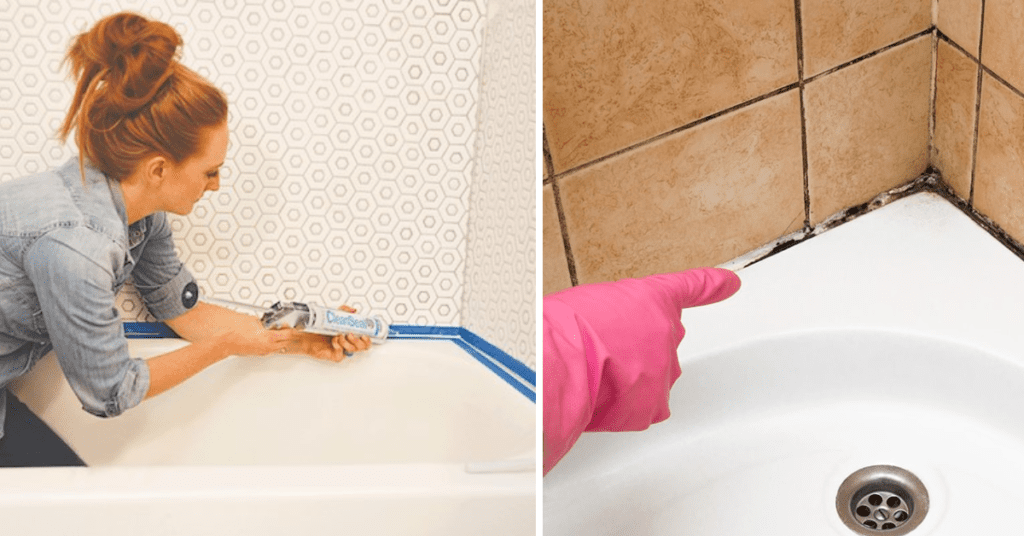
Step 5: Sealant Replacement and Maintenance
Over time, caulk can deteriorate and lose its effectiveness. Check regularly for any signs of wear or damage, and replace the caulk as needed. When replacing, consider using a mold-resistant caulk, such as 100% silicone caulking. Not only is silicone waterproof and flexible, but it also contains additives to resist mold and mildew growth.
Preventive Measures to Avoid Mold Growth in the Future
Beyond following the steps above, there are additional measures you can take to prevent mold growth in your shower caulk in the future:
- Use a mildew-resistant shower curtain: Opt for a fabric or vinyl shower curtain that is specifically labeled as mildew-resistant.
- Fix any leaks or plumbing issues: Check regularly for any leaks or plumbing problems and address them promptly to prevent excess moisture buildup.
- Replace grout and caulk regularly: Grout and caulk can deteriorate over time, so regular maintenance and replacement can help prevent mold growth.
- Keep humidity levels in check: Use a dehumidifier or air conditioner to maintain proper humidity levels (below 50%) in your home, especially in high-moisture areas like the bathroom.
- Regularly check for and fix any cracks or gaps: Inspect your shower caulk and sealant regularly for any cracks, gaps, or damage that could allow moisture to seep in and create a breeding ground for mold.
Advanced Tips and Tricks
- Choose the Right Caulk: Invest in high-quality, mold-resistant caulk like GE Silicone II* K/B Supreme for areas with high exposure to water.
- Fix Leaks Promptly: Even small leaks can lead to significant moisture buildup. Regularly check your plumbing and fix any leaks to reduce water exposure on caulked surfaces.
- Seal Grout Lines: Just like caulk, grout should be sealed properly to prevent water absorption and mold growth.
Tips for Long-Term Mold Prevention in the Bathroom
- Keep an Eye on Humidity Levels: Mold and mildew thrive in high humidity. Consider investing in a dehumidifier or other moisture-absorbing products to keep humidity levels under control.
- Regularly Inspect and Clean Showerheads: Mineral deposits can build up on your showerhead, creating the perfect environment for mold growth. Regularly clean and disinfect your showerhead to prevent any buildup.
- Keep Exhaust Fan Vents Clean: Dust and debris can accumulate in the vents of exhaust fans, reducing their effectiveness. Regularly clean these vents to ensure proper ventilation.
How often should I reapply caulk in my shower?
It is recommended to reapply caulk every 1-2 years or when signs of wear or damage are visible.
Can mold grow on silicone caulk?
Yes, mold can still grow on silicone caulk if it is not properly maintained and cleaned.
Can I use bleach to remove mold from caulk?
Bleach can be effective in removing mold, but it may also damage the caulk. It is recommended to use a gentler solution such as vinegar or hydrogen peroxide.
How long does it take for mold to grow on caulk?
Mold can start to grow on caulk within 24-48 hours in a humid and damp environment.
Can I prevent mold growth by simply wiping down my shower after each use?
While wiping down surfaces can help minimize moisture, it is not a foolproof method for preventing mold. Regular cleaning and maintenance are necessary to effectively prevent mold growth in the bathroom.
Conclusion
Preventing mold in shower caulk requires consistent maintenance, proper ventilation, and the right cleaning techniques. By following this step-by-step guide, homeowners and DIY enthusiasts can protect their bathrooms from the harmful effects of mold, ensuring a clean, healthy environment for years to come. Remember, while short-term fixes can be effective, addressing the root cause of moisture and promoting good airflow are the keys to long-term success in preventing mold growth in your bathroom.


