

How to Remove Caulk from Wood
Removing excess caulk from wood surfaces can be a challenge, especially if you’re unfamiliar with what kind of tools and techniques to use. Whether you’ve accidentally spilled too much caulk into gaps or need to clear away residue left over from prior projects, the job can seem intimidating without proper guidance. Thankfully, there are several tried and true methods for removing unwanted caulk that anyone can master with a bit of time and patience. In this blog post, we’ll guide you through exactly how to remove caulk from wood step by step so that your next project turns out perfect!
Importance of Removing Caulk Properly from Wood
Caulk is a versatile and essential tool for sealing gaps and cracks in wood surfaces. When applied correctly, it can prevent water damage, drafts, and insect infestations from wreaking havoc on your home. However, if not removed properly, caulk can become unsightly over time or trap moisture and cause rot. Removing caulk the right way ensures that your wood surfaces remain in good condition and can be resealed as needed. This not only maintains the aesthetic appeal of your home but also helps to prevent potential damage and save you money in the long run.
Tools You’ll Need for Removing Caulk from Wood
Before diving into the removal process, it’s important to gather all the necessary tools. Here are a few items you’ll want to have on hand before getting started:
- A utility knife or razor blade for cutting away excess caulk
- A scraper tool for removing larger chunks of caulk
- Denatured alcohol or mineral spirits for dissolving caulk residue
- A sponge or cloth for wiping away dissolved caulk
- Sandpaper for smoothing out any rough spots after removal
- Cleaning supplies for tidying up the area after you’re finished
4 Easy Safety Precautions
- Using Protective Gear: As with any DIY project, it’s important to take safety precautions before starting. Since you’ll be working with sharp tools and chemicals, it’s essential to protect yourself from potential hazards. We recommend wearing gloves and safety glasses while removing caulk to prevent injury.
- Proper Ventilation: Some of the products used in caulk removal can emit strong odors or fumes, so it’s important to work in a well-ventilated area. Open windows or use fans to circulate fresh air while working.
- Avoid Contact with Skin: Certain chemicals used in caulk removal can irritate the skin, so make sure to wear gloves and avoid direct contact with your hands. If you do get any of these substances on your skin, wash them off immediately with soap and water.
- Proper Handling of Tools and Chemicals: Always read and follow the instructions on any tools or chemicals you are using for caulk removal. Improper use can result in harm to yourself, others, or your wood surfaces.
Types of Caulk on Wood
Identifying Different Caulk Types
Before removing caulk from wood, it’s important to determine what type of caulk you’re working with. Different types of caulk require different removal methods, so knowing this information beforehand will save you time and effort. Here are three common types of caulk used on wood surfaces:
- Silicone Caulk: This type of caulk is commonly used in high-moisture areas, such as bathrooms and kitchens. It is flexible and waterproof, making it ideal for sealing joints around sinks, tubs, and showers.
- Acrylic Latex Caulk: This type of caulk is a popular choice for general household use. It is paintable, easy to clean up with water, and often comes in a variety of colors to match your wood surfaces.
- Polyurethane Caulk: This type of caulk is extremely durable and flexible, making it ideal for exterior use. It can also be used for high-moisture areas but tends to be more difficult to remove compared to other types of caulk.
Considering the Age and Condition of Caulk
In addition to different types of caulk, it’s also important to consider the age and condition of the caulk before starting the removal process. If you’re working with old or damaged caulk, it may be easier to remove compared to newer caulk that is still in good condition. In some cases, you may be able to simply peel away old caulk with your hands, while in others, you may need to use tools and chemicals for a more thorough removal.
6 Easy Step-by-Step Guide for Removing Caulk from Wood
Step 1: Softening the Caulk
Before attempting to remove caulk, it’s important to soften it first. This will make the removal process easier and prevent damage to the wood surface. You can use a hairdryer or heat gun on low setting to gently warm and soften the caulk, making sure to keep the tool moving constantly over the caulk.
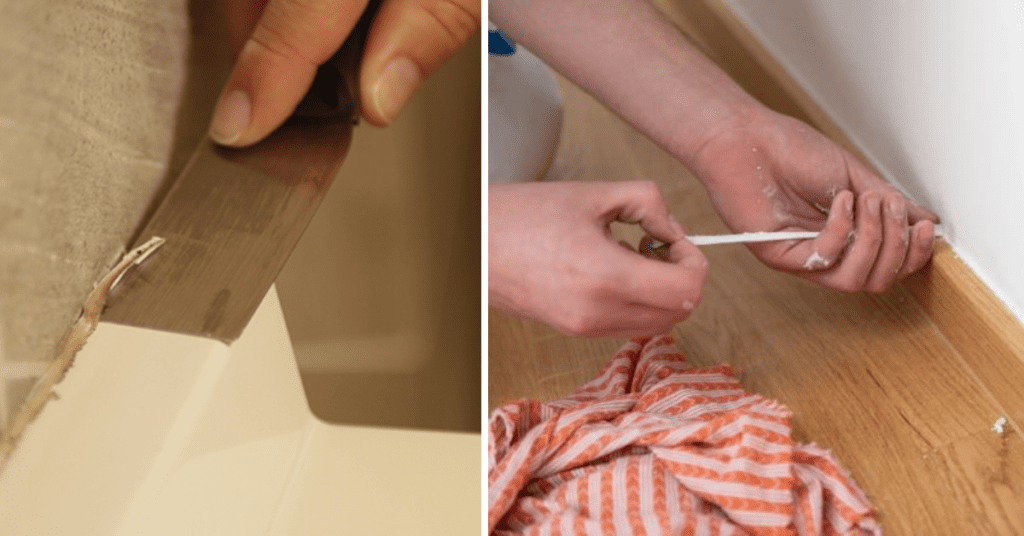
Step 2: Cutting and Scraping Away Excess Caulk
Once the caulk is softened, use a utility knife or razor blade to carefully cut away any excess caulk that may have overflowed into gaps or onto non-wood surfaces. A scraper tool can also be used to remove larger chunks of caulk.
Step 3: Applying Chemical Remover
If there is still residue left on the wood surface, apply a chemical remover such as denatured alcohol or mineral spirits. These products will dissolve the caulk and make it easier to remove. Simply apply the remover to a cloth or sponge and wipe down the affected area.
Step 4: Peeling or Pulling Away Remaining Caulk
Once the caulk has been softened and dissolved using a caulk softener or remover, you can begin the process of peeling or pulling it away from the wood surface. Take your time and work methodically, ensuring you remove all traces of caulk. If you encounter any stubborn residue that is difficult to remove, you may still need to use a scraper tool or fine-grit sandpaper to gently scrape or sand it away. Remember to be gentle to avoid damaging the wood surface.
Step 5: Sanding the Residue
After the majority of the caulk has been carefully removed using a caulk remover tool or a putty knife, it is recommended to use fine-grit sandpaper to gently sand down any lingering residue. This meticulous step helps to ensure that the surface is not only clean but also perfectly smooth and ready for resealing or painting. Taking the time to achieve this level of preparation will result in a more professional and long-lasting finish.
Step 6: Cleaning the Surface
After carefully and meticulously removing all the caulk using a caulk remover tool or a putty knife, it is crucial to ensure that the wooden surface is completely clean and free from any remnants or residue. To achieve this, gently wipe the surface with a damp cloth or sponge, paying close attention to crevices and corners where debris might be lurking. This step not only eliminates any remaining caulk particles but also prepares the wood for resealing or painting. Once the cleaning is done, allow the area to dry thoroughly before moving on to the next step. This will ensure optimal adhesion and a flawless finish for your subsequent sealing or painting efforts..
Stubborn Caulk Removal Techniques
In some cases, caulk can be difficult to remove and may require additional techniques. Here are a few methods you can try if the standard removal process is not effective:
- Chemical Caulk Remover: If the above chemical remover does not work, you can try using a specialized caulk remover product specifically designed for stubborn caulk.
- Caulk Softener: In instances where the caulk is extremely old and hardened, a caulk softener can be used to penetrate and soften the caulk before attempting removal.
- Steam Application: Similar to using a hairdryer or heat gun, steam can also be effective in softening caulk. Use caution when using this method as steam can cause burns.
- Heat Gun Method: A heat gun can also be used to soften caulk, but it should be used carefully as excessive heat could damage the wood surface.
- Abrasive Methods for Tough Residue: If there are still bits of caulk residue left after using other methods, you can try using an abrasive tool such as a wire brush or sandpaper to remove it.
Remember to always use caution and follow proper safety precautions when attempting to remove stubborn caulk. If the caulk is particularly difficult to remove, it may be best to seek professional help or advice.
Cleaning and Preparing the Wood Surface
Removing Residue
After the caulk has been successfully removed, it’s important to clean the wood surface thoroughly. Use a mild detergent and water to remove any leftover residue or debris. Rinse the area with clean water and dry it completely before proceeding.
Sanding and Smoothing
If the wood surface appears rough or uneven after caulk removal, you may need to sand it down using fine-grit sandpaper. This will help to smoothen out any imperfections, such as bumps or ridges, and create a more polished and even surface. By taking the time to properly prepare the wood, you’ll ensure better adhesion and a more professional finish when resealing or painting. So, grab your fine-grit sandpaper and get ready to transform that surface into a smooth and flawless canvas for your next project!
Cleaning with Solvents
In some cases, cleaning with solvents may be necessary to remove stubborn residue or stains. Be sure to use a solvent that is safe for wood surfaces and always follow the manufacturer’s instructions carefully.
Reapplying Caulk (if necessary)
After thoroughly cleaning and preparing the wood surface, you might find it necessary to reapply caulk in areas where it was removed or if there are still gaps or cracks present. Before doing so, make sure to use a caulking gun and select an appropriate sealant for the task. It is recommended to use a paintable caulk that will adhere well to wood surfaces and can be painted over for a seamless finish.
To apply the caulk, begin by carefully and smoothly filling in any gaps or cracks completely, ensuring that the caulk is evenly distributed. Take your time to ensure thorough coverage. Once the caulk has been applied, use a damp cloth or your finger to gently smooth out the surface, creating a clean and professional appearance.
Allow the caulk to dry completely before proceeding with painting. This will ensure that the caulk is set properly and provides a durable and long-lasting seal. Following these steps will help ensure that your wood surface is appropriately sealed and ready for the next phase of your project.
Maintenance Tips for Caulked Wood Surfaces
Performing routine inspections and maintenance on caulked areas is essential in preserving the quality and appearance of your wood surfaces. This will help to identify any issues early on, prevent further damage, and prolong the lifespan of your caulk.
Here are a few tips to keep in mind when inspecting and maintaining caulk:
- Check for any visible cracks or gaps in the caulked area. If you find any, reapply caulk to seal them.
- Regularly clean caulked surfaces with mild detergent and water to prevent dirt and grime from building up.
- Pay attention to areas that are exposed to water or high moisture, such as around sinks or bathtubs. These areas may require more frequent maintenance and recaulking.
- Consider applying a coat of primer before painting over the caulk. This will help the paint adhere better and provide a more even finish.
- Apply a waterproof sealant on top of the caulk if it is located in an area that is frequently exposed to moisture.
- Regularly clean and dry the wood surface to prevent water damage or mold growth.
By regularly inspecting and maintaining the caulked wood surfaces, you can ensure their long-lasting protection and top condition for years to come. Armed with these tips, you now possess the knowledge and tools necessary to successfully remove, clean, and reapply caulk on wood surfaces. Bid farewell to stubborn caulk and embrace the beauty of a flawlessly sealed and well-maintained wood surface!
Troubleshooting Common Issues for Caulked Wood Surfaces
In some cases, despite taking all the necessary steps and precautions, issues may still arise with caulked wood surfaces. Here are a few common problems you may encounter and how to troubleshoot them:
- Caulk Peeling or Cracking: This can be caused by improper application or poor adhesion. Try removing the old caulk and thoroughly cleaning and drying the surface before reapplying the caulk.
- Damage to the Wood Surface: If the wood surface has become damaged or warped over time, it may cause the caulk to crack or peel. In this case, you may need to repair or replace the damaged area before recaulking.
- Mold or Mildew Growth: If left unchecked, mold or mildew can grow on caulked wood surfaces. To remove it, mix equal parts of water and bleach, apply it to the affected area, let it sit for a few minutes, then scrub with a soft brush or sponge. Rinse the area thoroughly and dry it completely.
- Caulk Discoloration: Over time, caulk may become discolored due to exposure to sunlight or certain chemicals. If this occurs, simply remove the old caulk and reapply a fresh layer.
Remember, prevention is always better than cure, so make sure to regularly inspect and maintain caulked wood surfaces to avoid these issues.
FAQs for Caulk Removal from Wood
Can I use a scraper to remove caulk from wood surfaces?
Yes, a scraper can be used to remove excess or stubborn caulk. Make sure to use a plastic or rubber scraper as metal scrapers may damage the wood surface.
Do I need to sand the wood surface after removing the caulk?
Yes, it is recommended to sand the wood surface after caulk removal to smoothen out any imperfections and create a better surface for resealing or painting.
Can I use any type of caulk on wood surfaces?
It is best to use a paintable caulk that adheres well to wood surfaces and can be painted over for a seamless finish. Check the manufacturer’s instructions to ensure it is suitable for wood surfaces.
How long should I wait before applying paint or sealant after caulking?
It is recommended to wait at least 24 hours for the caulk to dry completely before proceeding with painting or applying a sealant.
Can I use soap and water to clean caulked wood surfaces?
Can I use soap and water to clean caulkYes, mild detergent and water can be used to regularly clean caulked wood surfaces. Make sure to dry the surface completely after cleaning. Remember to also use an appropriate solvent for tougher stains or residue.ed wood surfaces?
Conclusion
With the right tools and techniques, removing caulk from wood surfaces is achievable. Although the process may be labor intensive and require a lot of patience and persistence, it can be done without causing any damage to your wood surfaces. Whether you choose to use simple household tools or opt for more specialized equipment, make sure that safety is your top priority throughout the entire process. Should you attempt a stubborn caulk removal job, take extra caution to protect yourself.
Once the caulk is removed, thoroughly clean and prepare the wood surface before replacing the caulk with a fresh coat that matches well with your cabinets or baseboards. Remember that regular maintenance of your caulking will ensure it lasts longer and looks better for years to come! If you need help understanding which type of caulk is best for wood surfaces in your home or business, reach out to a professional who can lend a helping hand.


