

How to Caulk Around a Sink
Caulking rarely makes it to the top of the list of enjoyable home improvement tasks. However, its value to your plumbing’s integrity and your kitchen or bathroom’s esthetics is second to none. In this detailed guide, we will take the meticulous walk-through of how to caulk around a sink, from assessing the existing condition to troubleshooting common issues, to provide you with the tools and knowledge you need to do it like a pro.
Understanding the Importance of Caulking Around a Sink
Caulking around your sink isn’t just a cosmetic choice; it’s critical to maintaining a clean and watertight area. The Caulk seals out water, which can be a big problem in areas prone to high humidity and splashes. Over time, Caulk can dry out, crack, or deform, compromising its functionality and leading to water damage in your cabinetry or walls. High-quality caulking is, therefore, crucial for ensuring that your sink remains a fortress against moisture-related issues.
Why Regular Check-ups Are Necessary
Like any other part of your home, the Caulk in your kitchen or bathroom will age and wear out. Checking your Caulk should be part of your regular home maintenance routine. The check-up should be done once a year or whenever you spot a problem. Remember, it’s always better to be proactive than deal with water damage repairs later.
Assessing the Condition of the Existing Caulk
Before you rush out to buy Caulk, look closely at the Caulk already in place. Are there visible gaps? Is the Caulk moldy, or is it peeling away from the sides of the sink? Any of these signs necessitate re-caulking. If the Caulk is in good shape, you can skip the replacement process and maintain a regular inspection schedule.
Gathering the Necessary Tools and Materials
Preparing to caulk is half the battle won. There are a few essential tools and materials that you’re going to need:
Tools:
- A utility knife
- Caulk gun
- A caulk finishing tool or a plastic spoon
Materials:
- Caulk
- Silicone-based for better flexibility and water resistance
- Clear or colored, matching your fixture for an aesthetic finish
- Rubbing alcohol for cleaning
- Rags for clean-up
Safety Precautions for Handling Caulk
When working with Caulk, taking some precautions is essential to avoid potential hazards. Remember to:
- Work in a well-ventilated area
- Wear protective gloves and eyewear
- Avoid direct contact with the skin or eyes
- Thoroughly clean any spills or splatters immediately
8 Easy Step by Step to Caulk Around a Sink
Proper caulking involves a systematic approach that ensures a good seal that looks professional. Here are the step-by-step instructions you should follow:
Step 1: Removing Old Caulk
Use a utility knife with a sharp blade to gently score along the edges of the old Caulk and create a clean separation line. Slowly peel away the softened Caulk with the knife or your fingers. For more stubborn Caulk, consider using a caulk removal tool that can help loosen it more effectively. Remember to work carefully to avoid scratching the sink or countertop surfaces.
Step 2: Cleaning and Drying the Area
Once the old Caulk is removed, clean the area thoroughly to remove any residue or debris left behind. Use a gentle cleaning solution if needed and gently scrub the surface to ensure it’s free of dirt or grime. After cleaning, dry the area completely with a clean cloth before proceeding to the next step in your project. This step is crucial to ensure a smooth and durable application of the new Caulk.
Step 3: Applying Masking Tape (Optional)
If you’re concerned about maintaining a straight line when applying Caulk, especially around a freestanding sink where precision is key, consider using masking tape as a helpful tool. You can create a clean and professional finish for your caulking project by carefully applying masking tape along the edges.
Step 4: Cutting the Caulk Tube Nozzle
When cutting the caulk tube’s nozzle, make sure to trim it at a 45-degree angle for the right bead size. The hole should be smaller than you think you need; you can always cut more, but you can’t put any back.
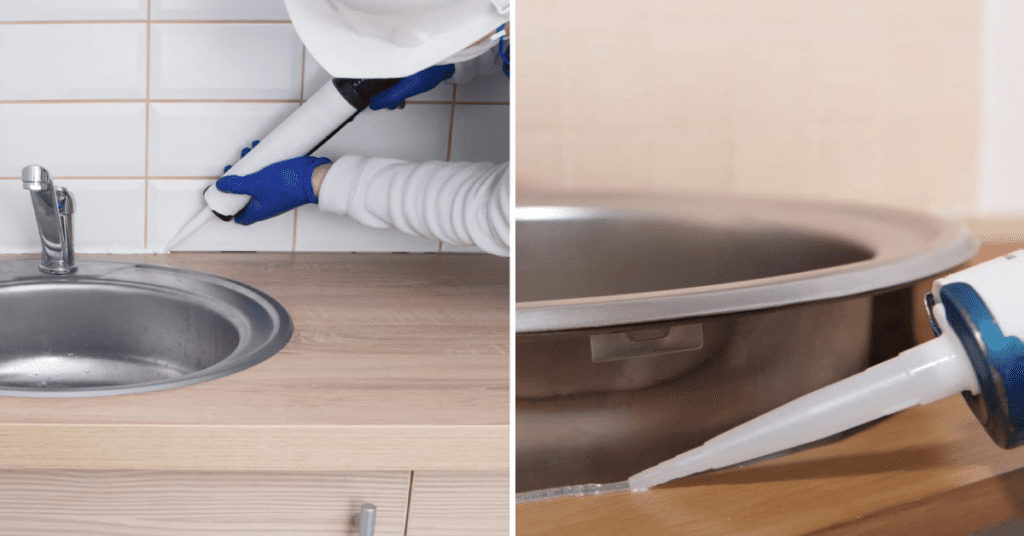
Step 5: Applying Caulk
Hold the caulk gun at a 45-degree angle to the seam and apply a smooth, continuous bead of Caulk. Make sure to maintain the angle throughout and aim for a consistent flow. To achieve a clean and professional finish, try to complete the entire span without interruptions.
Step 6: Smoothing the Caulk
Run a caulk finishing tool, spatula, or even a plastic spoon gently along the caulk line to smooth it out. Smoothing the Caulk is a crucial step that makes your work look clean and ensures the Caulk is properly seated.
Step 7: Removing Excess Caulk
The smoother your Caulk looks, the better your outcome will be. Taking your time and working precisely to achieve a seamless finish is important. After applying the Caulk, gently wipe away any excess using a clean rag or finishing tool to ensure a professional-looking result.
Step 8: Allowing Caulk to Dry
Your Caulk needs time to cure. Read the instructions on your caulk tube, as drying times can vary. You should leave it undisturbed for at least 24 hours.
Inspecting and Touching Up
After you’ve caulked your sink, it’s essential to inspect the area again once the Caulk is dry. Take a closer look to identify any small gaps or areas that might need more Caulk or smoothing out for a seamless finish. Making these final touch-ups ensures the job is thorough and well-executed before considering it complete.
Tips for Achieving a Professional Finish
- Take your time and work with precision.
- Use the right tools and materials for the job.
- Always clean and dry the area thoroughly before applying the new Caulk.
- Inspect your work closely to ensure a seamless finish, making any necessary touch-ups.
- Remember to clean up any spills or excess Caulk immediately.
Safety Precautions to Follow Throughout the Process
- Always work in a well-ventilated area.
- Wear protective gear, including gloves and eyewear.
- Avoid direct contact with skin or eyes, and clean up any spills immediately.
- Follow the instructions on your caulk tube for proper drying time and disposal.
By following these safety precautions, you can ensure a safe and successful caulking project. Remember, it’s always better to be safe than sorry.
Troubleshooting Common Issues
Even careful DIY-ers can run into problems. Here are a few common issues and how to deal with them:
The Caulk Won’t Stick
If your Caulk won’t stick, you may have missed a step in the cleaning process. Take a cloth soaked in rubbing alcohol and wipe down the entire length of the caulk line to remove any dust or grease.
Uneven Caulk
Uneven Caulk happens when you apply pressure unevenly. A finishing tool can help, but sometimes, the best course of action is to remove the Caulk and start over.
Cracked or Split Caulk
If you’ve applied too much Caulk or the area is under much stress, your Caulk might develop cracks. Over time, this can lead to water leaks. The best solution is to remove and replace the Caulk, ensuring that you have a smooth bead and that the Caulk doesn’t support the weight of any objects.
FAQs on How to Properly Caulk Around a Sink
Can I use caulk to seal gaps between my sink and countertop?
Yes, caulking is an ideal solution for sealing any gaps or cracks between your sink and countertop.
How long does caulk last around a sink?
With proper maintenance, caulk can last several years before needing to be replaced.
Can I use caulk instead of grout for my sink backsplash?
No, caulk and grout serve different purposes. It’s best to use grout for a backsplash as it provides better protection against water and moisture.
How do I remove old caulk stains from my sink?
You can use a mixture of vinegar and baking soda or a commercial caulk remover to remove old caulk stains. Make sure to follow the product instructions carefully and test on a small area first.
Can I paint over caulk if I want to change the color?
Yes, you can paint over the caulk once it has fully cured. However, make sure to use a high-quality paint that is compatible with silicone caulk.
Conclusion
Caulking around your sink is an aesthetic endeavor and a crucial part of home maintenance. By following the steps in this guide, you can ensure that your caulking is attractive and protects your home from water damage. Remember, a little care and patience go a long way in DIY home improvement.


